Showing posts with label DT post. Show all posts

Wednesday, July 29, 2015

Peonies

Hello,

I am up on The Ton blog today with peonies!


I know I took a bit of a crafting break, but I have been working on the ombre shaker card tutorial and a few other things for you. I've also been doing a lot of organizing, which makes me feel better. :)

If you would like to know what color combinations I came up with for the peonies, let me know in the comments and I'll write a post about it. Thanks for visiting!

I hope you're all doing well! Stay tuned. :)

Wednesday, July 22, 2015

Fabulous

Hello, I'm taking a break from crafting except for the post I have on The Ton blog today ;-) Please visit and leave some love! I have three cards to share. :) 


Also, I continue to add new things to my Craft Sale page. I've had over 30 orders and am so grateful to everyone who has helped me purge! :) I'm also having a big giveaway of Studio Calico stamps for two winners on my Instagram.

Wednesday, July 15, 2015

Don't Stop

If you are looking for The Ton's Mid Summer Release post, go here.
If you are looking for my Crafty Items Sale post, go here.
If you are looking for my Growing in Unity Day 3 post, go here.
Check out my giveaway on Instagram here.

--- 

Hello! I'm on The Ton blog today with a card inspired by a gorgeous mood board. :) Be sure to check it out and leave me some love.


Monday, July 13, 2015

The Ton's Mid Summer Release

If you are looking for my Growing in Unity post, go here.
If you are looking for my Crafty Items Sale post, go here.
Check out my giveaway on Instagram here.

---

Good morning, friends! The Ton is having a mid-summer release today with some fabulous and unique gilding along with coordinating dies for three of our earlier stamp sets: Fresh Cut Peonies, Panda Can't Even, and Simple Florals. Shop for the latest release on the site. You MUST check out the Crystal Embellishments, Beads, and Gems!

You can find much more details by visiting The Ton Blog or follow us on Instagram, Facebook, Pinterest, or Twitter for updates. Did you know we also have a Flickr group? Be sure to link your projects that use The Ton products!

The other design team members have created some stunners! You can visit Jessica and Mayline on their blogs.

I have three cards to show off today. I'll start off with my simplest card.

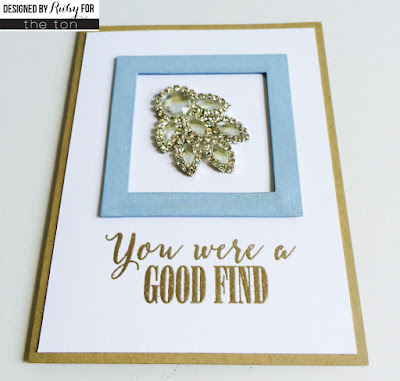
This card was actually inspired by the most recent Runway Inspired Challenge: #87 Holly Fulton.


I die-cut a square using the second frame in MFT's Die-namics Square Frames and Papertrey Ink's Spring Rain cardstock. I attached it to the center of white cardstock with foam tape. I glued down the Flourish Embellishment with Scor-Tape since it's a strong adhesive. The sentiment is from Shoe Wardrobe 2d. Ed. Outline and was stamped with VersaMark ink and heat embossed with Liquid Platinum Embossing Powder. I attached the white cardstock to kraft cardstock cardbase. Such a clean and simple card but still a beauty. It's hard to tell in the picture, but I finished off the blue frame with some Zig Wink of Stella Glitter in clear. I didn't want to add any other embellishment or sequins because the center piece is the focal point.


My second card is a shaker card. I stamped the flowers and leaves from Simple Florals with VersaMark ink and heat embossed with gold embossing powder. I used the Zig Clean Color Real Brush Pens in pink, orange, and red shades to color them. These are GORGEOUS brush pens. I did not use watercolor paper so I didn't need to add any water to it for blending. I liked them as they were. For the leaves, I used a green color. It's hard to see in the pictures but I used one of the dies from Papertrey Ink's Doodlie-Do Die Collection for the center. I filled the shaker with beads in Lime as 'leaves.' I fussy cut and arranged the flowers and leaves around the shaker area. The sentiment is from Friggin Fabulous and was stamped with VersaMark ink on acetate sheet and heat embossed with Ranger Gold Tinsel Embossing Powder. Due to inky fingers, I messed up on the bottom of my card so I decided to shade it with a pale pink ink and glued down the sentiment over it. I finished it off with some sequins from Cinderella's Ride Couture Mix. The shaker piece was attached to a white cardbase. 


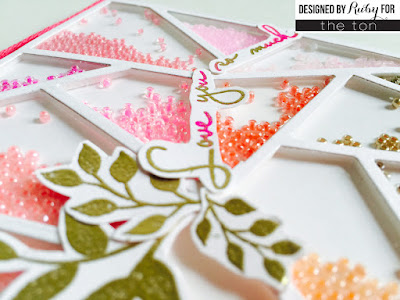
My third card took me some time, but I think it was totally worth the effort. I wanted to make a shaker card using a cover plate die so I used MFT's Die-namics Abstract Cover Up and die-cut white cardstock and white foam. Recently, I switched from using foam tape to fun foam because the finished cards remain sturdier and the embellishments don't stick to it. I removed the negative pieces and added a piece of acetate sheet between them with glossy accents. I turned it over and started filling in the empty areas with some of the new beads in shades of pink, peach, and gold. Once all the areas were filled, I added glossy accents to the outlined areas and attached my card base over it... yep, I guessed it and I did pretty well! I added some pink twine to the top part -- it looks darker in the picture for some reason. The sentiment from It's Cray Cray was stamped with VersaMark ink and heat embossed with gold and pink embossing powder to match the beads. I stamped the leaves from Wild Peonies and Mini Wild Florals with VersaMark ink and heat embossed with gold embossing powder. I fussy cut the sentiment and leaves and attached them to the front with glossy accents. 


Thank you so much for visiting! Don't forget to stop by everyone's blog to leave them some love for all their crafty efforts. ♡♡♡

P.S. My top 5 favorite beads are the following: Clear Hot Pink, Ultramarine, Mint, Light Peach Pearl, and Lemon Tart.

**Note: If links do not work, please be patient. I will try to update them later today. 

Wednesday, July 8, 2015

Cards, Sale and More

Hello! Thanks so much for visiting my blog today. I have so many things to share with you.

I'm on the Butterfly Reflections Ink blog with two AMAZING cards for you, showing off techniques that were inspired by Jenn's CASE-d card from yesterday. Check out that post again to refresh your memory. ;-)


And do leave me some love on the BRI blog. There is a 15% off sale on in-stock items until the end of the week. Take advantage and stock up on some of those goods! Code is CATSAWAY15.


I'm also on The Ton blog today with FIVE cards. Yes. Haha. They were really quite simple to make. I'm showing how you can create your own backgrounds.


Lately, I've been purging a lot of items from my craft room. I have been crafting for almost one year and am getting better about what kind of things I will use most. A huge thank you to everyone who has placed an order -- most things have shipped out already and I hope they arrive to you soon! I still have A LOT more and continue to update as I browse my stash. Check out that post here. Please message me if you have any questions!

Did you miss my first ever guest design post?! I was on the MarkerPop blog using Gorjuss stamps. Do check it out!


I've been working behind the scenes on my new website AND a shop for my cards. :) Hopefully they'll launch by the end of the month. Thank you to everyone for all their support and love! Have a great week.

Wednesday, July 1, 2015

Miss You

I'm on The Ton blog today with a lovely card for you all! :)


Thanks for stopping by! Don't forget to check out my Peerless watercolor and stamp set giveaway on Instagram. :) Have a great week.

Monday, June 29, 2015

In the Mood

Hello, crafty friends! The Ton's DT has some amazing cards to show off today. We are enrolled in Catherine Pooler's latest class called In the Mood, which showcases beautiful mood boards put together by StampNation DT member Maureen Merritt. I used Catherine's Mood Board Inspiration from here. If you feel your creative juices flowing, play along as well and link up to her blog!


I'm in love with mood boards. Certain color combinations can be so exquisite - like the one above! I wish I had more time to make more cards for you. :) But I'll leave you with this simple card featuring Heart Diamonds and the sentiment from our popular Pyrotechnics set. 


I started with some watercolor paper slightly smaller than size A2 and stamped the largest heart diamond outline with Ranger Archival black ink in rows. For the free watercoloring, I used the following Distress Inks: Dusty Concord, Peacock Feathers, and Picked Raspberry. 


I stamped the sentiment with VersaMark on black cardstock and heat embossed with white embossing powder. I fussy cut around it and added it to the bottom with foam tape. Lastly, I taped the white cardstock piece over cardstock that matched with one of the colors. 


Thanks for visiting! Check out everyone else's card to see how they were inspired by the gorgeous mood board.

Wednesday, June 24, 2015

Lucky to Have You

Today I'm on The Ton blog with a really fun card! I know you'll love how I created this. Please visit and leave some love. Thanks!


Tuesday, June 23, 2015

Amazing

Hello! I'm on the Butterfly Reflections Ink blog today with two cards. Please visit and leave some love! Thank you! :)


Monday, June 15, 2015

Vintage Florals

I'm up on The Ton blog today with this set of vintage floral cards. Go check it out for details and leave some love. Thank you for the love!


Wednesday, June 10, 2015

A Good Heart

I'm up on The Ton blog today with this sweet card. Go check it out for details and leave some love. Thank you for the love!


Linking to the following challenges: 

Tuesday, June 9, 2015

Happy Birthday

Hello there! Yes, it's my birthday today, but I'm also featuring a birthday card on the Butterfly Reflections Ink blog today. Please visit for details on how I created this cute shaker card featuring the new Avery Elle Swim Team. :-)


Remember my giveaway for The Ton's I Got You set ends the night of June 15th and my Summer Coffee Lovers Blog Hop blog candy giveaway ends the night of June 12th. Leave comments for your chances to win! Also, I am giving away Mama Elephant's Photobomb stamp set on my Instagram account. :-) Thanks for visiting!

Friday, June 5, 2015

The Ton's Third Release: Day 5

Welcome to day 5 of The Ton's third release. Today, we are showing cards featuring Shoe Wardrobe 2nd Edition in Solid and Outline stamp sets. Be sure to comment on earlier posts to increase your chances of winning a stamp set: Day 1 Wild Peonies, Peony Garden, and Get it Girl; Day 2 Mini Wild Florals and I Got You; Day 3 Pyrotechnics, and Day 4 Heart Diamonds. You can start placing your preorders today, with estimated shipping date of June 15. I think these stamps are definitely worth the wait! ♥ Stop by other Design Team members Jessica and Mayline's blogs for details on their cards.


I have three cards for you today, using both Shoe Wardobe stamp sets. The styles and angles of the shoes in these sets are different from the first edition and still pair really well with them. For my first card, I wanted to do something very basic. I love black and white combination paired with another bold color. It gives it such a nice contrast. The background is from a black and white patterned paper pad I have. The frame die is from Paper Smooches Fancy Frames Icons Dies. I die-cut the frames with both black and white cardstock so that the white part can be where I stamp the shoes and the black part becomes the frame. I also die-cut the frame using double-sided foam sheet for, guess what--dimension! ;-) I used the black inner piece, cut off the little scallop and stamped the sentiment on it with Versamark and heat embossed with white embossing powder. I added some matching enamel dots. I'm really glad that I have been practicing different styles and I love how this came out. 


Here's a closer look at the frame:

And from this angle. Don't you love the details on the shoes? They are incredible! The pink shoes have a double layer - so the design on top can be stamped in different color or even glitter! 


My second card is something new to me. I have been watching other crafters try this no-line coloring, including Copic markers. I was surprised you could use them with an image stamped with distress ink. Of course, I chose these really small shoes to practice my no-line Copic coloring, lol. What do you think? It was pretty hard to take photos, and I will try this with different white cardstock. I feel like it looks a little abstract/artistic. It almost looks like it's watercolored. I had an idea in my head of how I wanted this to look on a card, and I'm pleased at how it turned out. 


I picked random Copic colors, but I wrote down what I used for each pair:
  • The coral/gray pair: E02, R22, R24, C5, C7, N0, W1, W3, and W7.
  • The teal/beige pair: BG13, BG18, E00, E33, and E37. 
  • The blue/black pair: B66, B69, C7, C9, and E00. 
  • Shadow for all three: BG10.

The window panel die cut is from Mama Elephant's Peek a Frame Creative Cuts. I die-cut white cardstock slightly smaller than size A2 and then with the window panel die. I stamped all the shoes, using some masking, with Antique Linen on each panel. I colored them with Copics and set them aside. I took the sentiment "we're a great pair" from one of the Shoe Wardobe 2nd Edition sets and used my MISTI to stamp it with a black dye ink. I used the MISTI because I wanted to make sure I got a crisp look without having to mess up. I placed the shoe panels back in their place with foam tape for dimension, because, well, I kinda love dimension on all my cards. 


I took a lot of pictures so you can see the coloring. For some reason, it didn't come out too crisp...but that gives it an artistic look, I hope?!? 


I added it on top of this beautiful Papertrey Ink cardstock in Hawaiian Shores that I just got yesterday! 

Okay, my last card was the result of an idea I had... it didn't come out exactly as I wanted, but it's close enough. Neat and Tangled carries a pretty cool box die, but I don't have it. So I created my own box! Here's a look at how I started. 


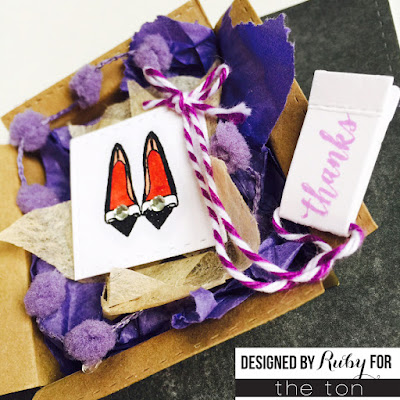
I used kraft cardstock for the box and scored some lines, did some cutting...and folded to create this look. I stamped one of the shoes on a small square, colored in with Copic markers, and added gem dots on top. The tissue paper behind it was die-cut with Pretty Pink Posh's Peek-a-Boo die. I arranged the 'shoe box' over the tissue paper and used glossy accents to stick it. Then I added some purple tissue paper behind that to add more color. I arranged all of that inside the box. I closed the outside of the box with gold washi tape, adding some Scor-Tape to secure it well. 


Here's what my final card looks like: 


I added some twine and a tag, stamped with the word 'thanks' from Vintage Frames set. 


I stamped the large sentiment with VersaMark on a smoky black patterned paper and heat embossed it with white embossing powder. I die-cut A2 size purple cardstock and added it behind it. I arranged the box above the sentiment and taped it down with Scor-Tape.

Closer look at the box and it's contents. Who wouldn't love to receive this as a gift?! 


What do you think of my cards? Check out all the other posts from this week and from other Design Team members for the Ton. Thanks so much for all the love and enthusiasm on all social media outlets. They are VERY MUCH appreciated! :) 


Come back every day this week and leave a comment on The Ton's blog posts for your chance to win a stamp set from the new release! Thanks for visiting! ♥ ♥ 

Thursday, June 4, 2015

The Ton's Third Release: Day 4

Welcome to day 4 of The Ton's third release. Today, we are showing cards featuring Heart Diamonds. Check out their blog and leave a comment for a chance to win a stamp set of your choice! Stop by other Design Team members Jessica and Mayline's blogs for details on their cards! :-)

I created four cards with Heart Diamonds. I love that it's a versatile stamp set that can be stamped with ink pads in layers, heat embossed for dimension, or stamped with the outline and colored with any medium. The first three cards show how I used the outline heart stamps and watercolored with distress inks. The last card features a very CAS design and shows how beautiful it looks stamped in layers. The sentiments in this set are some of my favorite! 


I created a lot of really 'happy' backgrounds using blending tools and distress inks and Mama Elephant pigment inks. I picked random colors just to see where it would take me. For some of them, I added splatters of water, sprays of gold, black, or white inks, and then some shimmer mist. Some were colored completely and others were partially colored. My embossing paste has been sitting and collecting dust so I took it out for these cards... before I put the cards together, I stamped several of the heart outline stamps on watercolor paper and heat embossed them in clear. I colored them with distress ink markers and added some water to lighten the color in some areas. Then I fussy cut them all out. 


I added drops of different colored Distress Ink reinkers on my embossing paste on my kraft sheet to create these textured colors for the card. I used a Tim Holtz stencil for this card. It's hard to tell in the photo, but I used three colors... a yellow, an orange, and I tried to create pink but got a pretty dark one because I ended up adding too many drops of the reinker. Oh well :) 

I stamped the "fabulous knows fabulous" on black cardstock with VersaMark and heat embossed it with white embossing powder. This sentiment is from a set we'll be showing you tomorrow! I added a strip of white cardstock behind it to bring out more of the white of the sentiment. I trimmed down the card on both sides so I could add black strips. I arranged some of the colored hearts to the card and stuck them down with foam tape.

For my next card, I used less colors. ;-) 

This time, I used my metallic gold embossing paste. Why have I not used this yet???? It's GORGEOUS, especially paired with this beautiful soft color. This card was much simpler. I had colored the background with Mama Elephant pigment ink and added white and shimmer spray to it. Then I used the same stencil and added the embossing paste in a diagonal manner. The sentiment is from the Pyrotechnics stamp set that we showed you yesterday. I stamped it on white cardstock with VersaMark and heat embossed it with gold embossing powder. I fussy cut around it and added it with foam tape. I see to use a lot of foam tape... I love dimension! 


I added foam tape behind three matching heart outlines and arranged them over the embossed part. Once I knew where I wanted them, I added some gold thread behind them and pressed them down. I don't know if you can tell in this image below but I added some Zig Wink of Stella Clear Glitter to the hearts. You can also see the shine of the metallic gold embossed circles. 


For my third card, I thought of doing a shaker card, but I still used some embossing paste and inky background. I only used WPlus9's Lake House Spray Mist and added white embossing paste using another stencil. I thought the Papertrey Ink's Tag Sale #11 Die was rather unique to use here... it's more than just luggage tag, right?! I die-cut the pieces out using black cardstock and filled it with some of the heart outlines that I fussy cut earlier. I glued some down inside so all the pieces didn't fall to the bottom. I added pink and white twine to it and taped it down at an angle. The sentiment "you were a good find" was stamped on white cardstock with VersaMark and heat embossed with teal embossing powder. I fussy cut it and added it below the tag. The sentiment will be in a set we'll debut tomorrow. 


Here's a closer look at the tag contents. I love how this sentiment goes really well with the heart diamonds or any of our earlier diamond sets! 


My last card is really clean and simple! I love colors, but I try to create really different designs with all my cards. This was so easy to make, I could mass produce them. There are so many layer stamps out and finding the right colors for those layers has been a pain. I've got a lot of ink pads and experimented with various colors, but last week I discovered that I could use my Hero Arts Ombre Ink pads for layered stamps! Doh! So that's what I used here for the hearts below. Don't they look gorgeous? Don't need to search for different combinations now! I mean, you can still do that... lol. I stamped four of the hearts with all three layers in the various Hero Arts Ombre Ink pads and added the sentiment above in black dye ink. I taped it over black cardstock to give it a beautiful contrast. 


Here is a closer look at the hearts. I didn't stamp them perfectly but I think they came out great regardless. :)


I hope you enjoyed our design team's inspiration today. We love hearing what you have to say about the new release and our cards.

Come back every day this week and leave a comment on The Ton's blog posts for your chance to win a stamp set from the new release! 
Thanks for visiting! ♥ ♥ 

Linking to the following challenges: