Hi friends!
Sorry, I have been quite busy behind the scenes. I have some amazing news - I finally launched my new website. Parts of it are still under construction so bear with me. Please check it out and subscribe to A Rare Ruby Crafts. I am also on the Butterfly Reflections Blog today. Check my post on it for more details.
I will no longer be posting here so don't forget to subscribe! There is a new Facebook page you can like, a Pinterest page to follow, and my Etsy shop finally! FINALLY! Thank you, friends! Have a wonderful week.
♡♡♡
Monday, August 10, 2015
Sunday, August 9, 2015
Winner
Hello! I wanted to thank everyone who participated in my giveaway. The random winner of the CraftMates Lockables storage is the following:

Please contact me within one week to claim your prize and sending me your mailing address. Thanks! More giveaways and fun stuff to come soon. Have a great week.

Please contact me within one week to claim your prize and sending me your mailing address. Thanks! More giveaways and fun stuff to come soon. Have a great week.
Wednesday, August 5, 2015
Inner Light
Hello friends! I want to give a warm welcome to all my new subscribes. I'm touched that so many of you chose to follow me and my crafty updates. Lately, I have been busy with some personal things so I haven't been able to update regularly. Today, I'm on The Ton blog so I'd love for you to stop by and see how I made another shaker card. Here's a quick look at it:

I'm linking all the products I used below.
If you haven't had a chance yet, do check out my post on gilding storage and enter my giveaway that ends Friday. Last week, I posted my ombre shaker card tutorial and ink combination swatches for layering stamps. Yesterday, I posted my sale items on Instagram for easier viewing and spent all day packing orders. I appreciate all the help and support I've gotten lately. You're just the bestest! ♥


Thursday, July 30, 2015
Gilding Storage + GIVEAWAY
If you are a new visitor, please note that I no longer am using this blog. My new site can be found at A Rare Ruby Crafts. The new post for the ink combinations can be found here. Thank you!
*all links and posts from this blog that were transferred to the new one will still link to old blog posts. Please disregard since I can't fix each one. if you have questions, just send me a message. :)
---
My Ombre Shaker Card Tutorial can be found here.
The post about ink combinations for layering stamps can be found here.
Be sure to check out my Craft Items Sale!
---
You've probably read and seen a lot about storage options, especially from Jennifer McGuire's videos and blog. When I first started collecting sequins, I bought this CraftMates 28-Compartment Caddy for about $6. Unfortunately, I did not realize that it was about to get super popular with all the crafters and eventually more than doubled in price and finally was discontinued. Insert sad face for always being late to the party. So I waited and, with my sequin and bead and confetti collection growing, waited some more. All of the gilding was still in the original plastic packaging so whenever I crafted, I would have to dig through bags to find the colors I needed. When I received The Ton's latest beautiful beads, I knew I had to invest in something. I had seen the Darice 82-piece Tiny Container Storage Tray around for a while but did not want to invest in it for $30-something at the time. Then I saw a friend post about it in the Facebook Stamp Junkies Group and that pretty much enabled me into finally purchasing it. I started with one to test it out. I filled it up with all the seed and bugle beads.
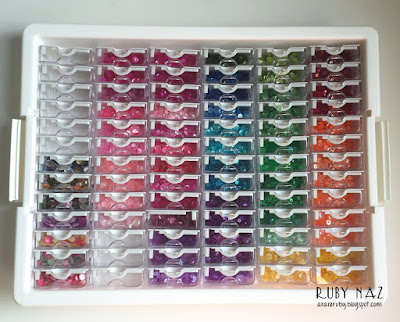

Then I tested out to see if I could fit my sequins in there. As you can see below, it was a success so I ordered one more tray.


Also, I wanted to share how I am storing my embossing powders now. I bought this cool coffee pod tray and look - it fits all my embossing powders except for Zing! I still have to do samples and improve on my organization but it's coming together slowly. :-)


I have one of these CraftMates Lockables to giveaway to a lucky commenter.

*all links and posts from this blog that were transferred to the new one will still link to old blog posts. Please disregard since I can't fix each one. if you have questions, just send me a message. :)
---
My Ombre Shaker Card Tutorial can be found here.
The post about ink combinations for layering stamps can be found here.
Be sure to check out my Craft Items Sale!
---
You've probably read and seen a lot about storage options, especially from Jennifer McGuire's videos and blog. When I first started collecting sequins, I bought this CraftMates 28-Compartment Caddy for about $6. Unfortunately, I did not realize that it was about to get super popular with all the crafters and eventually more than doubled in price and finally was discontinued. Insert sad face for always being late to the party. So I waited and, with my sequin and bead and confetti collection growing, waited some more. All of the gilding was still in the original plastic packaging so whenever I crafted, I would have to dig through bags to find the colors I needed. When I received The Ton's latest beautiful beads, I knew I had to invest in something. I had seen the Darice 82-piece Tiny Container Storage Tray around for a while but did not want to invest in it for $30-something at the time. Then I saw a friend post about it in the Facebook Stamp Junkies Group and that pretty much enabled me into finally purchasing it. I started with one to test it out. I filled it up with all the seed and bugle beads.

I love that it's small enough so there isn't too much empty space. I had invested in the other Craftmates boxes, but those were TOO big. I could not stand how much space they were taking up.

Now it's easier for me to organize ALL my beads together and sort it by color! The tray comes with a cover so that they don't fall out.

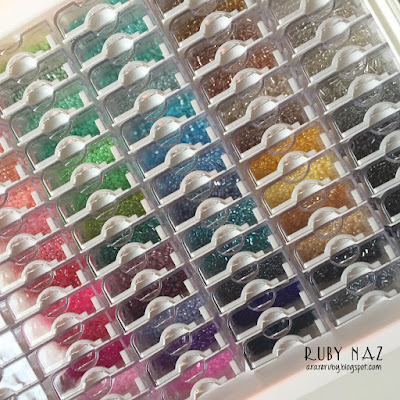
Then I tested out to see if I could fit my sequins in there. As you can see below, it was a success so I ordered one more tray.
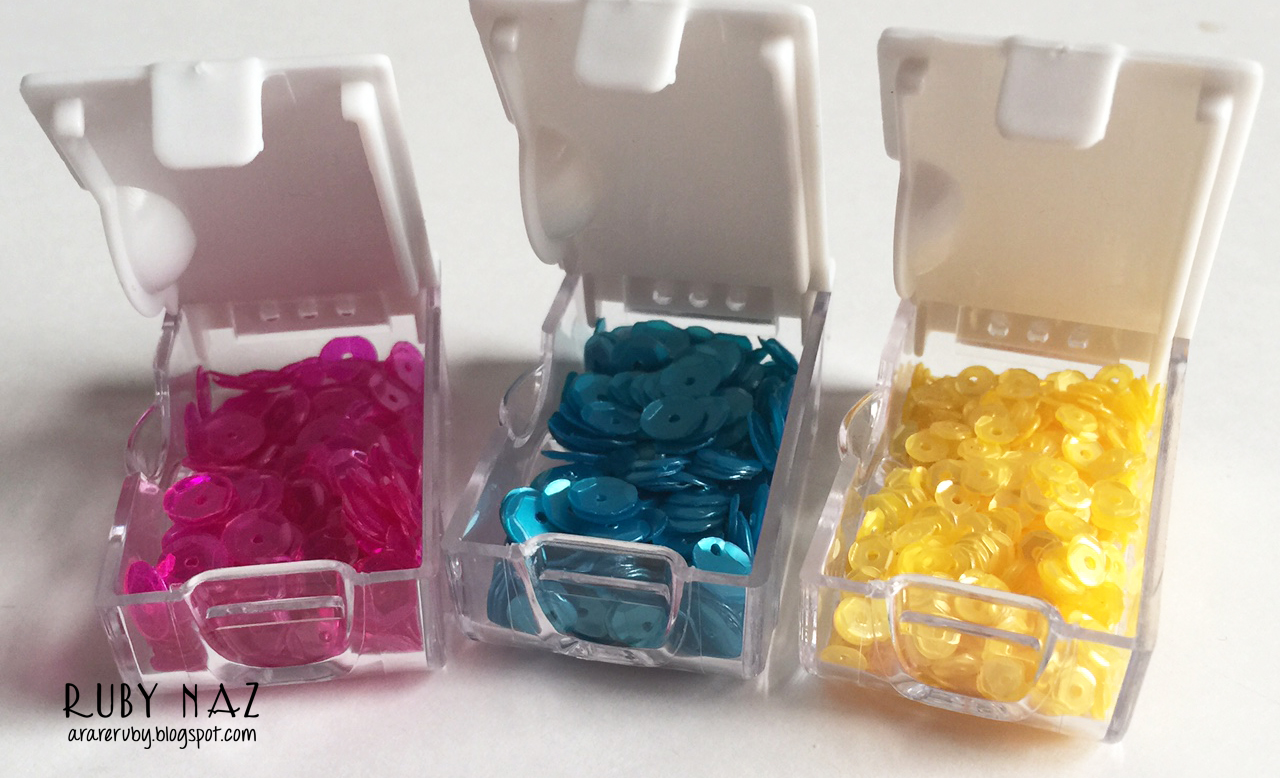

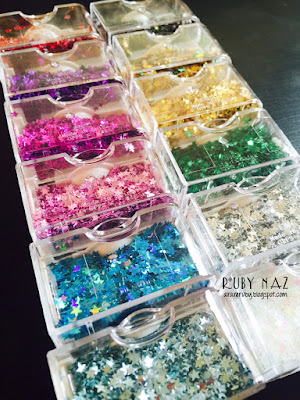
These are also sorted by color. However, I placed all my colors sequins together, ranging from 4mm to 10mm. The larger ones were divided into two containers but since I had more than enough, that was fine.

I also stored The Ton's Couture Mixes in these. Here's a view with the container open:

This is the side view. Pretty simple design.

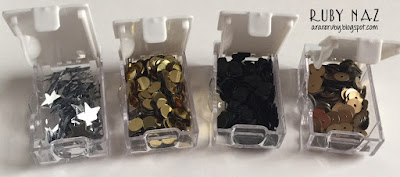
Finally, I bought a third tray because I wanted to store all my neutral colors and confetti separately. If you have a lot of sequins and gilding, this is a great investment. Do not let the price turn you off because there are 78 containers altogether. The 28-compartment was going for about $14 anyway so relatively speaking, it is worth the cost.
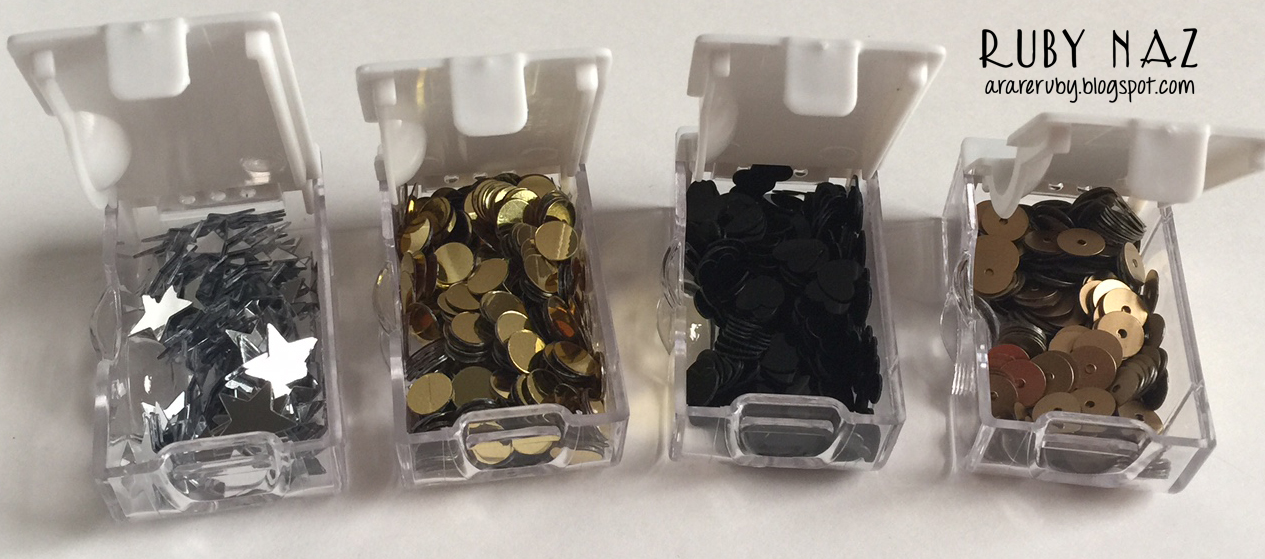

I also added The Ton's latest star confetti in these containers, too. Aren't they gorgeous? Now all I want to do is stare at my gilding! ;-)


I hope you found this post useful. All of The Ton's gilding can be found here. How do you store your sequins?
Also, I wanted to share how I am storing my embossing powders now. I bought this cool coffee pod tray and look - it fits all my embossing powders except for Zing! I still have to do samples and improve on my organization but it's coming together slowly. :-)


I have one of these CraftMates Lockables to giveaway to a lucky commenter.

U.S. only due to shipping costs. I'll select a winner from all the comments left on any of today's posts by Friday, August 7. Have a good week!


Ink Combinations for Layering Stamps
If you are visiting from Jennifer McGuire's blog, please note that I no longer am using this blog. My new site can be found at A Rare Ruby Crafts. The new post for the ink combinations can be found here. Thank you!
*all links and posts from this blog that were transferred to the new one will still link to old blog posts. Please disregard since I can't fix each one. if you have questions, just send me a message. :)
---
My Ombre Shaker Card Tutorial can be found here.
My Sequins/Beads Organization + GIVEAWAY can be found here.
Be sure to check out my Craft Items Sale!
---
I wanted to share the combinations that I discovered for layering stamps. Since I own all the inks from Altenew, Papertrey Ink, and WPlus9, I was able to play around with all of the colors and came up with a few that I loved. Red and yellow were the hardest, and I'm still trying to come up with a combination for red that satisfies me. I may have to invest in some more inks...since you can never have enough, right? ;-)

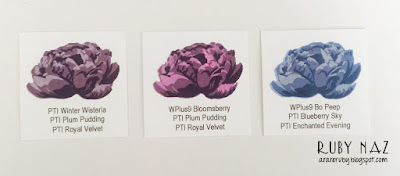
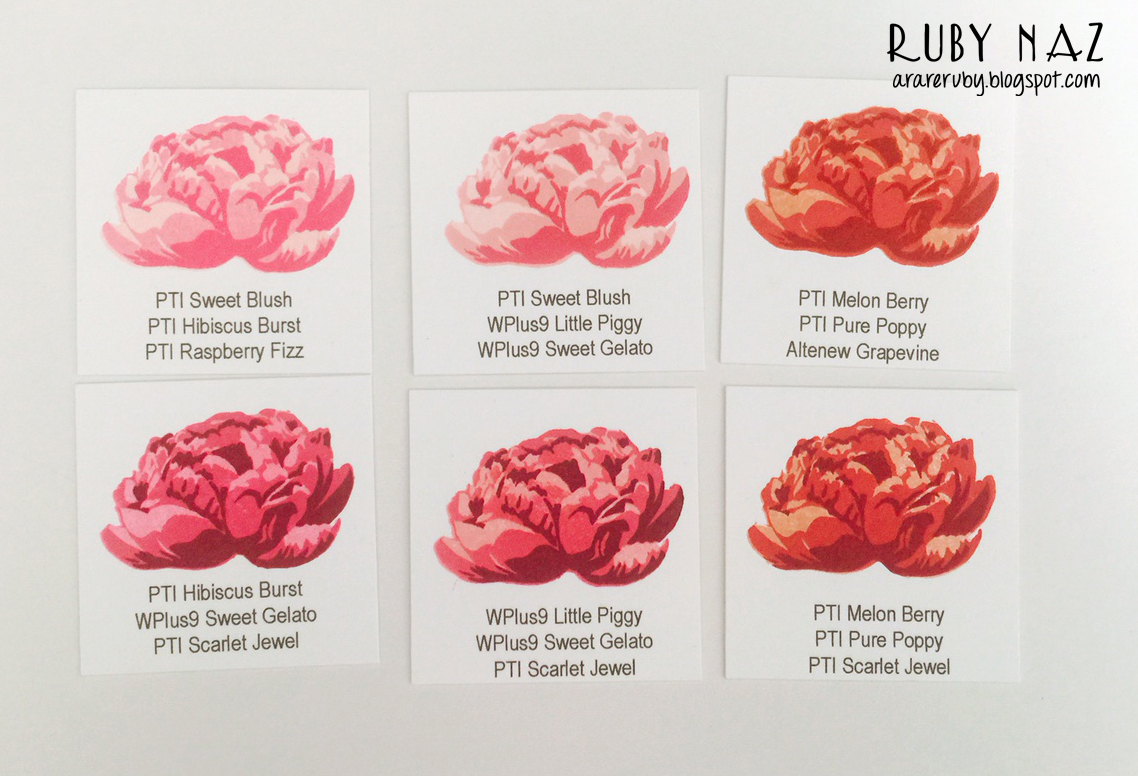
I love Jennifer McGuire's organization tips and so I used her blank ink swatch to type up the colors I used and then stamp the layers. Now these are stored with my ink swatches and make it so much easier for me to play with my layering stamps! I used one of the stamps from Fresh Cut Peonies for the swatches. These are SO easy to line up. I did not have to use the MISTI. ;-)

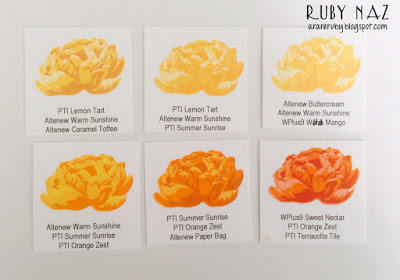
Here are the combinations for yellow and orange that I came up with. You can click on the image in order to read the names more clearly. If you have other ink brands, you can play around with those shades instead of having to invest in the ones that I have. I own other inks that I have not tried yet because I'm still organizing my crafty stuff! The organization never seems to end! :-P
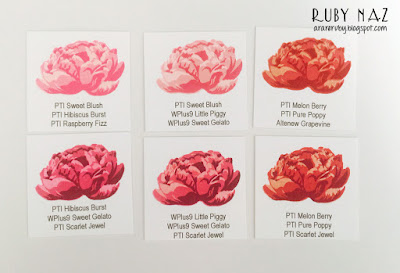
Here are the combinations for red and pink.
And here are the combinations for purple and blue. The great thing about flowers is that they come in countless colors and shades so you can get really creative with this! I hope you found this helpful and are inspired to try your own shades. I am sure that I will continue to find different combinations over time.
Here's a look at them all. Aren't they GORGEOUS? They may not be accurate due to lighting, but you get the idea.


Thanks so much for visiting! Check out my other posts from today. :-)
*all links and posts from this blog that were transferred to the new one will still link to old blog posts. Please disregard since I can't fix each one. if you have questions, just send me a message. :)
---
My Ombre Shaker Card Tutorial can be found here.
My Sequins/Beads Organization + GIVEAWAY can be found here.
Be sure to check out my Craft Items Sale!
---
I wanted to share the combinations that I discovered for layering stamps. Since I own all the inks from Altenew, Papertrey Ink, and WPlus9, I was able to play around with all of the colors and came up with a few that I loved. Red and yellow were the hardest, and I'm still trying to come up with a combination for red that satisfies me. I may have to invest in some more inks...since you can never have enough, right? ;-)


Here are the combinations for yellow and orange that I came up with. You can click on the image in order to read the names more clearly. If you have other ink brands, you can play around with those shades instead of having to invest in the ones that I have. I own other inks that I have not tried yet because I'm still organizing my crafty stuff! The organization never seems to end! :-P


I store them with my other ink swatches. They're not perfect yet, but I find it useful for now!


Subscribe to:
Posts (Atom)